
Beginner woodworking tips
Status: Draft
Should a programmer really be writing a blog about construction?
Probably not.
> But here are some things I've learning whle tinkering.
Are we drilling holes in the wall?
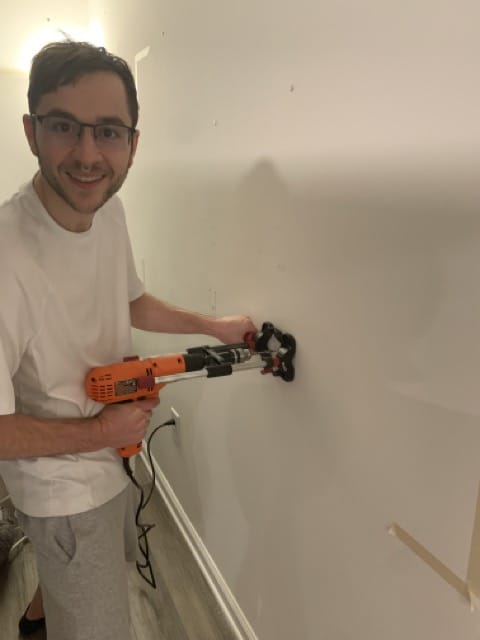 ❌
❌
Or saving the world from the upside down?
 ✅
✅
My first attempts were hilarious failures.
Ever try to hang something on the wall and end up with a massive hole? That was me in my first apartment 🙋♂️.
It was built in the 1920s and had plaster walls. I thought that's how all walls were built at the time, and concluded the only way to mount things was with a spring-loaded butterfly (toggle bolt) anchor... eek! Luckily, I later moved into newer construction with wood-framed walls.
Seeing through the wall

- After seeing images of what it's like behind a wall, mounting things became simpler.
- The wall you see is actually just a sheet of ~1/2" thick drywall.
- Behind that are 2"x4"x8' "studs", i.e. Vertical pieces of slender wood used to "frame" the walls.
- If you want something to be securely mounted to a wall – screw into a stud.
- If you can't access a stud for some reason, at least use a strong metal anchor. But usually, at least 1 stud can be accessed.
- Studs are typically 16" apart, when measured from the center of the stud. But not always. Especially around corners, windows, or middle of rooms.
- It's also important to aim for the center of the stud, otherwise, the screw could tear out the edge, resulting in a weaker join.
How to find a stud, and the exact center?
- When I first started, I didn't have a stud finder (and the first stud finder I bought was awful)
- I tried knocking on the wall to listen for different densities, but that is not reliable
- Then I learned about the magnet technique. I started with a simple fridge magnet, but eventually purchased this super strong studbuddy.
- Earlier I mentioned that the wall you see is just a 1/2" thick sheet of drywall fasted to the vertical 2"x4"x8' framing studs. Specifically, the drywall is fasted to the studs with metal nails. This means that if you slide a magnet over the drywall, it will be attracted to one of the metal nails. In this way, you can at least find the approximate location of a vertical stud. Then know that the adjacent studs are likely 16" to either side of your magnet.
- Is this the exact center of the stud? Not always. It takes a lot of nails to fasten drywall to 2"x4"x8' framing studs. Could the person who installed the drywall have driven the nail exactly center of the stud every time? Unlikely. If you are mounting something heavy like a TV, you'll want to test for the exact center. How do you do this? The short answer is with a high quality stud finder, such as this $30: franklin sensor M90. The more tedious and damaging method to find the center of a stud is with nail and hammer.
- First, aquire the longest, yet smallest diamter nail available. The nail should be at least 1/2" longer than the thickness of your drywall. Now, find the location where your magnet stuck to the wall. Move above or below that location by about an inch to avoid the screw behind the magnet. From there, meaasure about 1/2" to the right, and tap the nail in the drywall! If the nail goes all the way into wall without major resistance, the stud is not there. Remove the nail, and mark that spot with an "x". If instead, your nail hit something solid, that's wood! Remove your screw and circle the hole "o". Continue this process left and right of the magnet, until you can identify where the wood stops and the hollow space between the studs behinds. When you find it, draw a vertical line – this is the edge of your stud! Now, measure into the middle of those lines, and you have the center of the stud. Is it on the same vertical line as the magnet? Sometimes it is, but when mounting heavy objects, you should always double check.
- The only problem with this technique, is that now you have a bunch of small nail holes in the wall and something of a DaVinci looking drawing :D. Often, the object you're mounting will cover these nail holes, but still, it's not ideal. So instead, I recommend a stud finder. The highest quality and least expensive I've found is the Franklin sensor brand. It has a precise density sensor that will find the edges of the stud, and display it using a unique LED bars that help visualize the width of the stud. But beware - it registers all density changes, and there is more than wood studs behind drywall – such as water pipes and electrical wires - and it would be terrible to drill into either of those! New construction usually has "guard plates" which protects these materials. If you are in older construction though, beware of electrical wires that are running through studs. Franklin sensors does sell an upgraded model that can detect live wire, but a specialized meter might be more useful.
- So when you find a place that looks like a 2" wide stud, move the stud finder ~16" to the left or right, to find the other stud. As mentioned earlier, sometimes there are outlier studs are not 16" apart, but usually never two in a row that are not. Unless you are mounting something to the ceilling studs (yes the ceilling uses wood framing too! - usually just thicker wood); these studs are usually 24" apart. Another caveat, is that some contruction techniques use metal studs, in which case, please ignore all advice in this blog. This is very rare though, and if you have those, you'll likely know because they are more expensive. Most framing construction built after the ~1970s in the United States is done using 2"x4"x8' wood studs and drywall.
Leveling with a laser and tripod
- When I first started, I had a terrible manual bubble level. Worse, it wasn't even 16" wide to reach between 2 studs. So If I was trying to mount a shelf, that required 2 mounting brackets at the same horizontal level, I'd have to draw a horizontal line halfway, move my ladder, then try to finish the other half of the line. Basically, my first few shelves are not level :D
- You can improve this with higher quality and longer bubble levels of course, but my tool of choice is a laser level!
- It's a real luxury for home DIYs, but what a pleasure they are to use. They also require tall tripod, but Amazon Basics has cheaper options now.
- I basically only need 1 tiny pencil mark for each stud now. Once I find the center of the stud, I point the laser crosshair at that location, and I have perfectly level lines vertically for that stud, and horizontally to the next stud. even if the floor is not level, the laser auto-levels itself within 4 degrees!.
Cutting wood
TLDR: get a 4x8 foam insulation board to allow cutting on the stable floor, circular saw for it's depth adjustment, and if you need absolutely straight cuts, then a rip cut circular saw guide track such as kreg rip-cut
- wow did I make a lot of mistakes here.
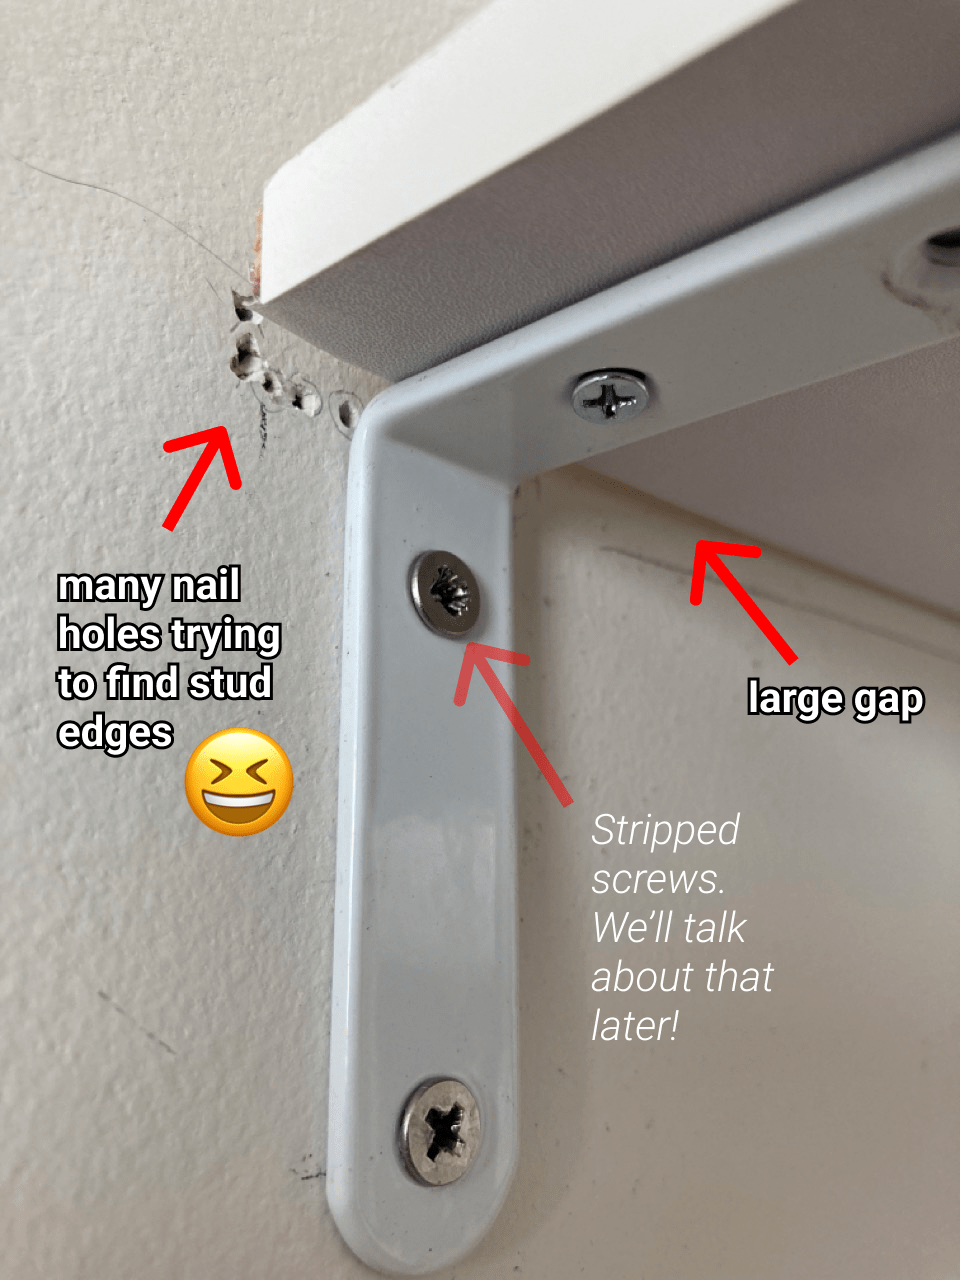
- my first shelves were not only un-level and with a dozen small holes behind the bracket, but the wood was not square to the wall either! ha. nail-holes-and-uneven-shelf
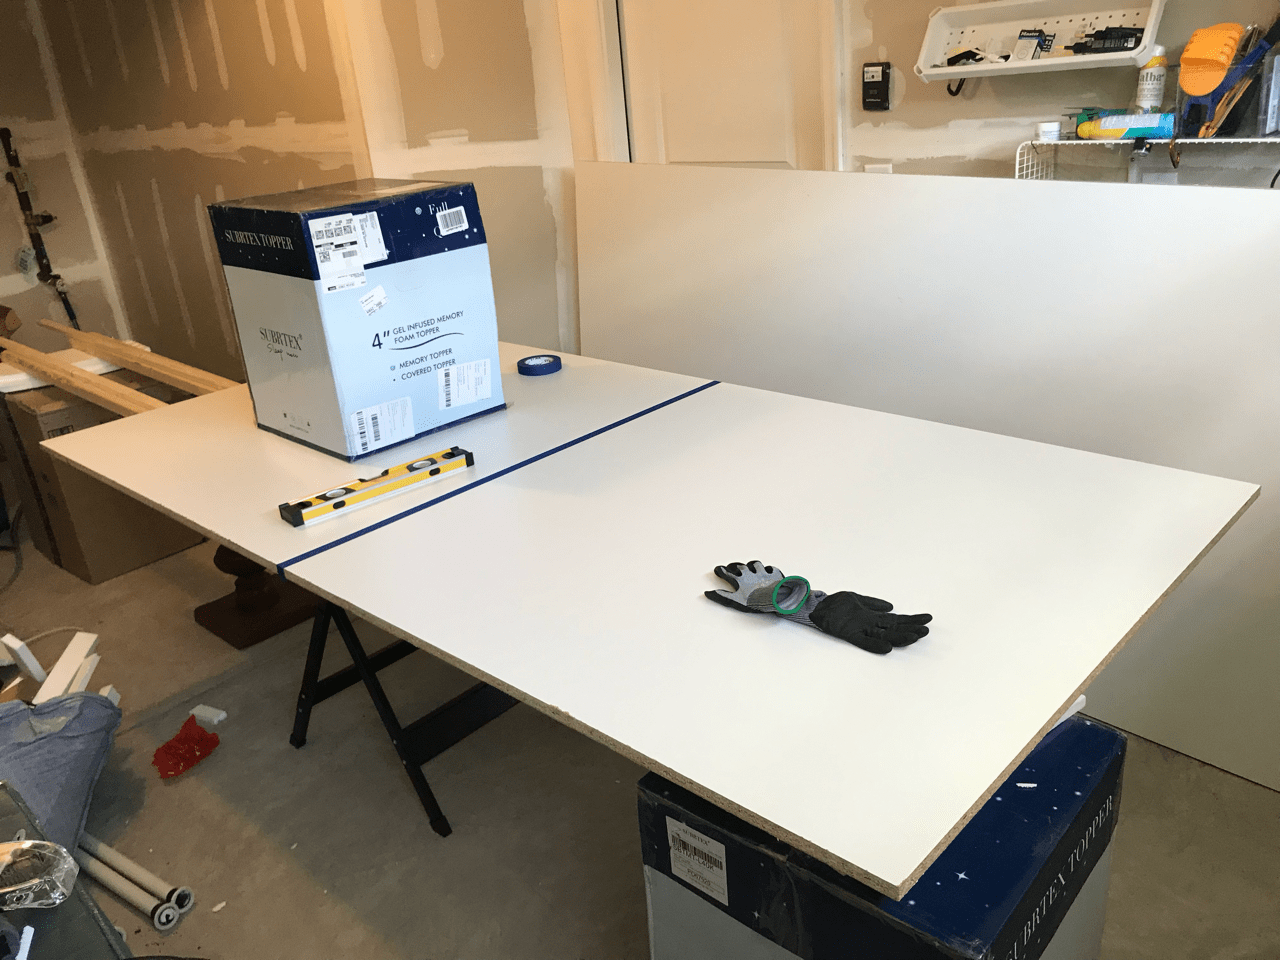
- in the beginning, I didn't even have a large table to cut wood on. My first piece of wood, I propped up using random household objects – it was dangerous. unsafe-cutting-1 unstable-cutting-2
- Now, I use a simple table made of a 4'x8' piece of 3/4" thick plywood and legs made from a piece of 4"x4" deck wood (like for fench posts). It works well.
- First, you'll definitely need some wood clamps. Usually more than you expect. I use about 3-4 for each big cut, with about 6" openings.
- So, you have a 4'x8' massive piece of wood, and you want to make a straight cut on the long side (called a "rip" cut) resulting in something like a 18"x8' piece of wood (or a "board" if you want to sound cool).
- Do you hang the wood over the edge of the table by something like 24"? This is how I started. It was wobbly and dangerous. 1) When I finished the cut, the 18" piece would just fall to the ground. What if, when it fell it took the saw with it, and the saw hit my leg? Not good. 2) When cutting, the wood would slightly move up and down, wobbling like an earthquake. This is because it was only secured on one side. 3) For 8' cuts, my arms weren't 8 feet! So How do I keep an eye on the straight line and move 8 feet? I did all kinds of stupid things like stand on top of the table and walk along. Eventually, I started to stand on the side and walk along the edge. Often, not leaving enough space at the ends for my jigsaw to clear the board (i.e. the jigsaw would hit the wall before it finished the cut!). And of course juggling a power cord if you opted for the cheaper $25 wired jigsaw like me.
- Eventually, I got a small "sawhorse" to support the hanging piece of 24" wood. this decreased wobble and helped the cut piece not fall to the floor after cutting. But this had problems too. For example, it was about 4" shorter than the table! So I had to wedge other pieces of wood between it. Also, I had to be mindful that the sawhorse leg was placed far enough from the center of the cut, so my jigsaw didn't cut into it! This usually required moving the handing piece out further, which increased the danger of the other variables!
- Even if you have 2 tables large enough to support a piece of wood like this, chances are that your cut will not be straight. It's really hard to cut a straight line with wood!
- the best way to cut straight lines is with a table saw. But these are big and expensive. Some professionals make their own, but ironically, if you are trying to solve this problem, you likely are not a professional and probably shouldn't take on a project like that! The cheapest piece of equipment I found to help me cut straight lines is a kreg 8ft straight edge cut line. It's basically a long piece of aluminum that you can attach to a board and use it as a guide for your saw. It works with both jigsaws and circular saws.
- Eventually, I upgraded from my $25 corded jigsaw, to a $50 corder circular saw. Wow, it really does cut wood like butter. A jigsaw is great for rounding corners or cutting shapes into wood, but it is a rougher cut, and can get snagged on knots in the wood. A circular saw is king for straight cuts. Another major benefit of a circule saw is that you can adjsut the depth of the blade! This has major unexpected benefits that solve the above dangerous scenarios of hanging piece of wood! So while a circular saw is scarier looking, it can actually be safer. Heres how it works:
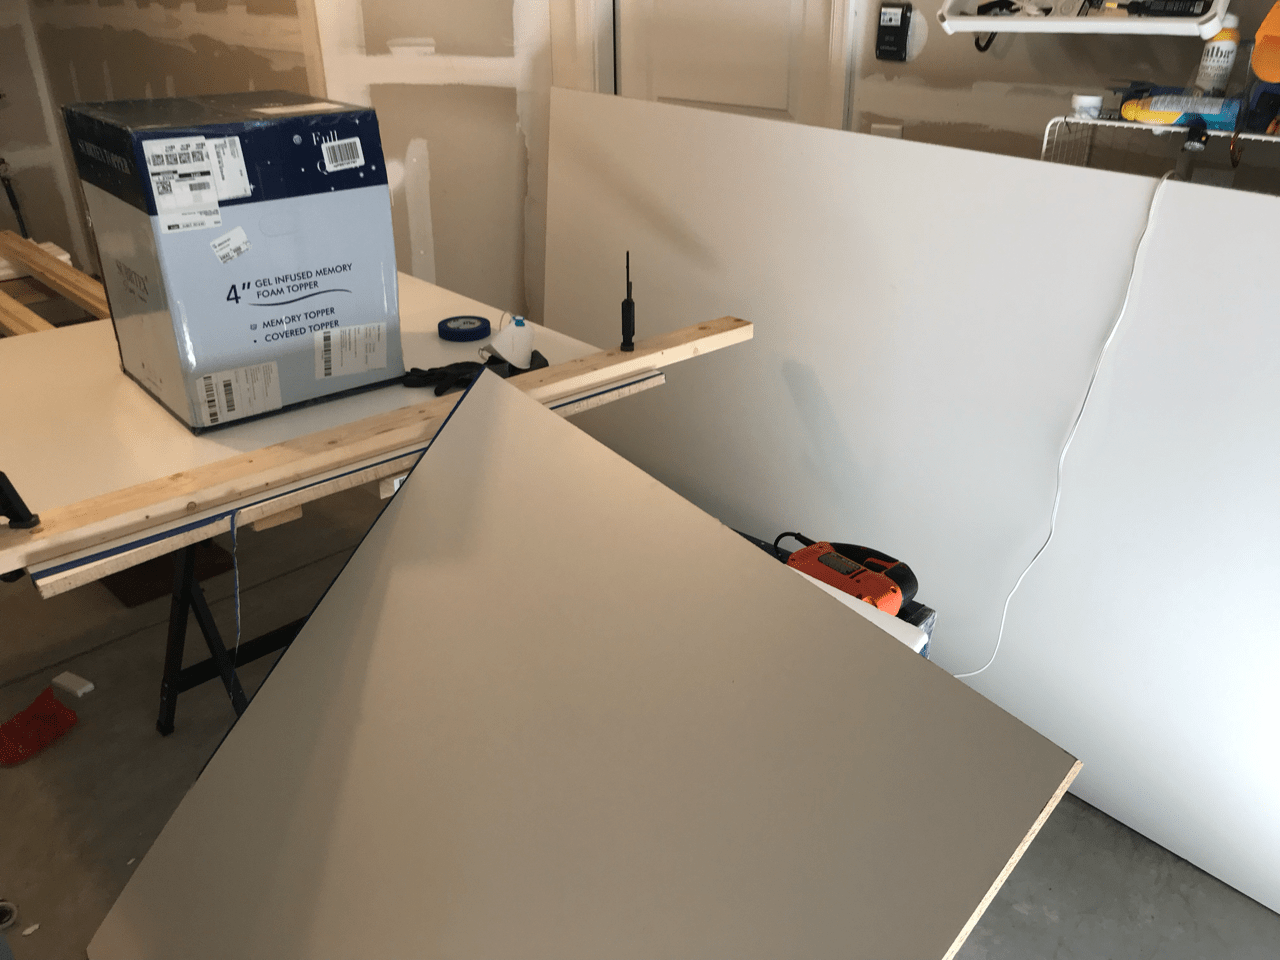
- Start with your large 4'x8' cutting surface. Place a couple 2"x8' pieces of framing stud timber on the table, spaced evenly (like studs in a wall, but horizontal!). Now, place the large piece of wood that you want to cut on top of the 2"x8' studs. You have effectively created a small 2" or so space between your the board and your table. Meaning that as long as the deptch of your circular saw is less than the depth of this space, then you can cut directly on top of the table! Before actually starting your cut though, ensure the studs and board are all clamped to the table, so nothing moves when you cut; and also try to make 2 studs a few inches to either side of your cut line, so support is concentrated around your cut, while not being too close to your blade.
- Pair this with a kreg straight edge XL cut guide and you're going to have a near perfectly straight cut. It's really so easy and delightful to cut wood this way. I can't believe it took me so long to learn. However, it still requires lining up the rail to be straight. Since most of my cuts are less than 24" wide (i.e. shelves), I now much prefer this cheaper Kreg "rip-cut" circular saw guide. They also make a longer version that allows 50" rip cuts (i.e. with the grain on the long side of the wood). It's more expensive, and would get in the way if attempting cross cuts (similar to the kreg staight edge XL). If I really needed to solve every case, I'd get a table saw with a massive surface. But I'm just small DIY projects.
- Note, this could also be done with a jigsaw, but most jigsaws dont't have adjustable depth blades, so you will need a much larger than 2" space between the table and your board, which will be harder to clamp, and require larger spacing wood. At that point, it's cheaper and easier to pickup a $50 circular saw with adjustable depth blade. The particular saw I bought even has pre-marked depth lines for common wood depths, such as 1/2", 3/4", etc. For shelves around the house, I am most often using 1/2" plywood (i.e. "3 ply"). Anything thicker starts to look bulky for my taste, and 1/2" is plenty strong for even heavy garage shelves (when mounted to studs properly.)
- There are some issues with this setup though, but they are far easier and safer to solve than using a jigsaw on a hanging piece of wood. Such as: what if you want to make a "cross" cut across the short side of the 4x'8' board (instead of an 8ft long "rip cut")? Well, you'll have to remove the 2"x4"x8' wood spacer studs and use shorter spaces such as 2"x4"x4' studs at a different angle. Otherwise, your circular saw would cut straight through the studs! This could maybe be less of a problem if you have a massive size room, or two massive tables, but in general, there are always some constraints to work around! Additionally, at this point, your kreg straight edge cut guide is likely configured to be 8ft. It's possible to re-assemble it into smaller increments, such as 4ft, but it is a major pain. It's almost easier to buy a second stragiht edge cut guide that is only 4ft. But at this point, your tools are adding up. Who knew cutting shelves had so many variables?!
A strong self-tapping screw that doesn't strip
- Screws. There are a lot of them.
- Think about simple shelf mounting "L" brackets. There are many types of brackets. Each have different size holes. Some holes have a flat surface, others have a concave bevel to accept the screw. If it's flat, "pan head" screws usually work best. These have a flat bottom to increase the surface area without using a washer. But, these are mostly made for screwing into metal sheets, so they are often missing other features such as "self-tapping" qualities, or if they do have self-tapping, the type of self-tapping mechanism is designed for metal, not wood. I like to find brackets that have the concave hole so I can use wood screws made for decks. These are the highest quality metal (wont snap or strip), come in many different lengths and diameters, and have the most delightful self-tapping mechanisms that shred through wood like butter.
- These days, I'm using these screws almost always: deck screws 2", #8, self tapping
- But, before you purchase a screw there are a few things to consider: How thick is your drywall? Using a nail, I found that mine is 1/2". So this means the screw needs to be 1/2" long before it even hits drywall. How far to screw into the wood stud? it depends on how heavy the object your hanging is. The thickness of the screw also matters too. For example, if you are mounting a floating bench to the wall that will support multiple human bodies, you'll likely need a massive 3/4" thick screw that is like 3.5" long (called "lag" screws). However, be wary of screws like this, because you will basically never be able to drill into that spot of the wood again. For this reason, I prefer to use the smallest diameter screw that wont snap. For most household shelves, I'm typically using a screw of depth #8 (x mm), and length 2". this means that the screw will be 1.5" into the stud (because .5" is consumed by the drywall). It helps to know the diameter of the hole on your bracket is before ordering screws. You usually want to go about 1 size down from the diameter of the hole. It's possible to use a screw of the same size (because of the gaps in the screw threads), but it is not enjoyable, and often unnecessary.
- Finally, after you have found the center of the stud using a magnet and stud finder, use a laser level with tripod, and marked your holes with pencils (ensuring you're not drilling into existing nails/screws, pipes, or wires!) – that last thing you want to do is pre-drill a hole. It's a tedious process itself! First, you have to find the right size bit, slightly smaller than your screw. Then, you have to ensure the bit is in the drill at a specific depth, the length of the screw. This can be complicated by objects blocking your drill from pushing all the way in. And, especially when mounting heavy object like TV's you'll want to ensure that bit drills straight into the wall (not at an angle). One interesting technique is to glue a small circle bubble level to your drill video. Or, you can buy a tool like a handheld drill block but this means that your drill bit should now be longer than your screw to compensate for the thickness of the straight drill bit guide! And long bits like that are more expensive. When using this, I often used it as a starting hole, and then finished the hole manually. But, this was tedious, because it required adjusting the length of the bit twice. And if you're switching between drilling and screwing (not batching the task), this becomes aggravating! It almost makes you want to purchase a second drill that is only for drilling. But then even with that, you're lucking around 2 tools, need a bigger extension cord, etc. And if your screws aren't magnetic, you wont be able to use magnetic wrist wraps to hold your screws. It's just a lot of micro problems that don't typically come to mind when you think of building a simple shelf – it's supossed to be fun right, not work! Though if you must drill an ultra straight hole and don't want to purchase a full "drill press" or encounter the anoyyances above, I have enjoyed using this $30 portable drill guide that mounts your electric drill).
- So this is a long way of saying, it really is delightful to use screws that are self-tapping. To be able to drive a screw into the wall without pre-drilling a straight hole of the right length and thickness is a major source of joy for me now! ha. This does come at a small design cost thought. Typically, these screws only come in dark deck colors, brown, black, green, tan. So if you're mounting a white metal bracket, the screw is going to be visually unappealing. You can of course paint the screw yourself, or cover it with a piece of white sticker. After dealing with the anoyyances of pre-drilling holes in the wall describes above, I have taught my self to love the stickers! Everytime I see the sticker, it's a reminder of how delightful self-driling screws are! Maybe you don't want to trick your brain into thinking like this though – that would be understandable :D
- but sometimes, self-drilling screws are simply not available. For example, the screw used to mount a 1/2" plywood shelf into the bracket needs to be small enough to drive at least 75% into the wood, but not long enough to pop out the top of the shelf. Accounting for the thickness of a metal shelf, this is usually around 12mm. From experience, it's difficult to find strong screws that don't strip that also have self-tapping qualities at that small of a length. Here is a decent non self-tapping screw for mounting 1/2" plywood to a metal bracket though.
- Speaking of 12mm screw diameter– that's another quirk of buying screws– often the measurements are in metric or imperial! There are plenty of conversion charts to help though.
- and speaking of stripping screws. This can happen if the screw it made of a weak metal. Often a good test of strong metal (but not always) is if the screw is attrced to a magnet. Weak metals often are not. Also, the type of screw head makes a difference. Typical "philips" head diamond shape adapter are poorly designed and strip more easily. These days, screws are being manufactured to accept better design bit styles, such as the "torque bit" or "square bits". By favorite self-tapping wood deck screws I mentioned earlier use a torque bit.
Wood veneer, laminate, or paint
- Often, a basic plywood shelf is not visually appealing. It has a rough yellow surface and the edges often have red or blue spray paint from the manufacturing process. There are basically 2 ways to make it more visually appealing: paint or veneer.
- veneer is basically a thin beautiful layer of something glued onto the surface of wood. Like the "Gilded Age" where cheap bronze metal was covered in a layer of expensive gold so it appeared to be solid gold! A simple veneer, or facade. Actually, around the 1970s Unites States had a period where all of their brick buildings were covered in thin sheets of metal. checkout images 7, 8, and 9 in this article to see the same buildings over the years. (not to mention streets covered overhead with electric wires! these are all now buried underground. Which makes it harder for young people to understand how infrstructure flows through cities – similar to how electronic objects are harder to deconstruct and tinker with now too (cars require specialized computers to access, iPhones have beatiful layers of printed circuit boards sandwhiched together with flat ribbon cables that is stunning but a lot harder to trace that the wiring inside of a rotary phone!). There are some illustrative books that help see inside everyday objects and explain fundamental mechanical concepts though!)
- extremely thin pieces of plastic (i.e. melamine or formica) fused with heat and glue to a wood top. This is what companies like ikea often use to make their table tops white, smooth, and water resistant.
- Edge banding is when a piece of plastic is thermally fused to the edge. You can buy your edge banding and use an iron or heat gun to liquify it's glue. It should be the right thickness for your wood, and you'll likely need to trim the edges of the edges. Unless you have massive and expensive thermal fusing equipment and high quality melamine type or laminate sheets, it will likely never be anywhere near as good as Ikea type furniture though.
- Luckily, many people prefer paint on wood than plastic laminate though. Painting requires a smooth sanded surface, usually multiple coats, a properly ventilated space, time to dry, etc. And smooth-finish cabinet quality paint gets expensive. Some types of wood accept paint better than others too.
Types of wood
- Have you ever wondered how a sheet of 4'x8' plywood is made? Are they cutting down 8ft wide trees? Did this shelf I'm mounting for a cat really come at the cost of a redwood sequoia??
- the answer is no, and how is actually fascinating! Basically, lumber mills will mount a tree to a lathe (think of corn holder eating tool), and spin it. Then, they will basically peel it like a potato! Pressing a long flat sharp knide into the side of the tree as it turns. This results in super wide sheets ("ribbons") the length of the tree. For thicker logs, a single turn could produce a ribbon 8ft by 4ft!. Then, these thin sheets are hot pressed and glued together to form plywood. That's why it's called "3 ply" or "5ply" – it's the number of thin sheets that are glued together.
- Other types of wood are made by pulverishing wood into chips. Then hot pressing and glueing these shredded chips together. This is called "fiberboard" or "particleboard". It's a great way to re-use wood that would typically be wasted. This type of wood is often used in manufactured furtniture.
- each type of wood has it's strengths and weaknesses. For example, "medium density fiberboard" often used in furniture is great for structural furniture, takes paint well, but is much heavier than plywood and does not hold a screw as well (because the screw is gripping a bunch of wood chips and glue). Screw grip into fiberboard can be improved by using "coarse thread screws", but then you need another type of screw in your collection, and these screws often are not self-drilling.
- OBS wood is similar to fiberboard- made with hot glued wood chips – except the chips are much thicker and rougher. This is typically used for "sheathing" aka the exterior of a house, or roofs, or under floors (aka the "floor boards"! below carpet or vinyl planking)
- Regular solid wood. This is the most expensive because it's actually a solid piece of tree (no spinning potato peeler lathe tricks here!). It's also heavy. And thick. But many people love the look of solid wood. Especially for table tops. Live-edge wood is becoming popular now too. For me, I'm more of a funcitonal design type person. I appreciate high finish projects like that when I see them, but for my own projects, I like to achieve 80% funcitonality without the 20% polish. As I said, I've tricked my brian into admiring white screw stickers, because they remind me of the joy of using self-tapping screws - haha. Your mileage may vary.
Working with metal
-
If you want thin and strong (or thick and near indestructable!) metal is a dream
-
How cool humans invented metal
-
When working with metal, you're really pushing the bounds of DIY. As a DIY person reading this blog, you probably should be taking searing hot flame torch to metal in your garage haha. Even screwing into metal sheets requires proper protective wear for shrapmetal flying through the air.
-
Luckily, companies like pipe-decor and makerpipe, sell pre-fabricated metal components that you can use to build most structural metal projects. Pipe-decor is super thick and strong galvanized steel. I really would try cutting through this. But I use it for mounting tables, that swivel because of their pre-threaded pipe fittings. Maker-pipe is especially neat because their connector work with cheaper and thinner "EMT conduit" metal. These are the types of metal pipes often seen in warehouses, that simply enclose wires as they are routed around the building. Using maker-pipe like this is similar to DIY pvc pipe projects, but much stronger.
-
The furthest I go when working with metal at home as a DIY type, is aluminum metal sheets. It's easier to cut and bend, bend, and screw into this type of metal. For example, peg boards,
-
a swivel table made of structural pipe from pipe-decor
-
klee-klamps, pipe collars, and maker-pipe, and EMT pipe
-
aluminum sheet metal
Electricity and the hidden wires that power our lives
- don't get me started on installing a ceiling fan.
- it helps you demystify how magical objects like ceiling fans are actually just connected to a physical wire hidden in your walls that eventually connects to a wire in the ground. Which if you follow that will lead you all the way to a power plant. And if you figure out how that power plant is actually generating the electricity, well flipping a light switch will suddenly feel like a much more powerful experience. Your appreciation for basic city utilities might multiply! Anytime I go outside it's a whole new adventure to study infrastructure. Unfortunately for humans, but forunately for learning, unlike cards and phones, it's not hard to find old decaying infrastructure (compared to modern infrastruture which is mostly buried).
- And internet? My favorite of them all. Magical data floating through the air. Besides 5G, most internet is still flowing through physical wires underground! There is even one that crosses the atlantic ocean. The amount of mega infrastructure projects completed by humans in such a relatively short amount of time is mind boggling source of inspiration and appreciation!
add images from public/wood make links open a modal with image and link, rather than redirecting